 |
| This is the picture I came across, I thought to myself that I could do this! :) |
I decided that I wanted to create a "set" using 4 different sized trees.
* 15 inch ($5.99 at Hobby Lobby)
*12 inch ($4.99 at Hobby Lobby)
*9 inch ($3.99 at Hobby Lobby)
*6 inch ($4.47 at Hobby Lobby for a 2 pack)
*Dark Green Yarn (leftover from other projects)
*Light Green Yarn (leftover from other projects)
*White Yarn (leftover from other projects)
*Hot Glue Gun & Glue (I went through a lot of glue!)
*Scissors
*Silver Bells (Pack of 8 $2.99 at Meijer)
*Pom Poms (I got several packs on clearance at Hobby Lobby for 30 cents a pack! And I bought at pack of Christmas Tinsel Pom Poms regularly $2.99 at Hobby Lobby, but it was half off all Christmas Items, so I got them for $1.49
 |
| Some of the supplies I used to create these cure little trees! |

Step 1: Use hot glue to attach yarn around the entire base of the tree. After that, use glue whenever you feel necessary to anchor the yarn to the tree.
Use hot glue to attach yarn around the entire base of the tree. After that, use glue whenever you feel necessary to anchor the yarn to the tree. 
Step 2: Continue around the tree, covering all parts with yarn. You will have to go back over and fill back in, creating different depth layers.
Continue around the tree, covering all parts with yarn. You will have to go back over and fill back in, creating different depth layers.
Step 3: Continue all the way up the tree.
Continue all the way up the tree.
Step 4:  Attach your tree topper. Attach your tree topper. |
| I decided to use a bell to be the tree topper. Be careful when you glue that you don't accidentally glue the "jingler" to the bell! |
Step 5:  |
| Start gluing Pom Poms onto the tree wherever you like. I went through and did one color at a time to try and evenly disperse them. |


I would recommend doing this first, but I did not have any felt with me, so I had to do it as a final step. Trace the base of the foam tree on the felt. I used brown for the green trees and then white for the white tree. Carefully cut out the circles, you will need some super sharp scissors to cut out the felt circles. I was able to purchase the felt for 20 cents a sheet.

Step 7:  Carefully hot glue the felt circle to the bottom of the foam tree. This will keep the foam from scratching whatever you set it on to display them.
Carefully hot glue the felt circle to the bottom of the foam tree. This will keep the foam from scratching whatever you set it on to display them.  |
| Completed Tree number 1: This is a 9 inch Tree, using a light green yarn, with red tinsel pom poms, dark green pom poms, white pom poms and a bell for the topper |
 |
| Tree #2: 15 inch tree wrapped in dark green yarn. I used light green, white & red tinsel pom poms and a bell for the topper. |
 |
| Tree number 3: Wrapped with Dark green & Light green yarn to give it a different effect. I attached white & red tinsel pom poms to this one, and topped it with a large white tinsel pom pom. This is a 12 inch form. |
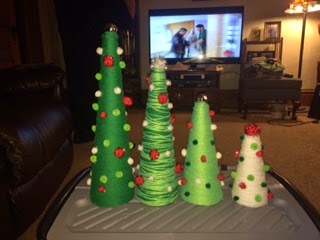
Left to right:
15 inch, 12 inch, 9 inch, 6 inch
 |
| I can't wait to put this up in our home to decorate for the Christmas season! |
 |
| Holiday Yarn Trees complete with felt om the bottom so not to scratch the surface they sit on. |
No comments:
Post a Comment