Materials:
5 1/2 in wide Orange Deco- Mesh ( I purchased mine after Halloween in 2014 at Hobby Lobby, so I got it for $2.39 a roll. I bought 3 rolls, but only used one. If you purchase it leading up to Fall, you can get it for anywhere between $4.99 and $7.99)
Wire Wreath Frame (I used a 14 inch wreath frame that I purchased at Pat Catan's for $2.79 - you can use any size wire wreath frame, the larger it is, the more Deco-Mesh it will require.)
Orange Paint - I used acrylic because I had it on had, truthfully, Orange Spray Paint would have been easier, but I didn't see the need to purchase it, so I made the acrylic work- it was left over from previous projects.
Orange Pipe Cleaners (I purchased at pack of 25 at Pat Catan's for $.83)
Hot Glue Gun/Hot Glue (This will make some steps much easier! Available at craft stores and many grocery stores. I have several and didn't pay more than $4 for any of them. One I have had for over 6 years, so don't feel the need to spend a lot!)
Green Deco-Mesh ( I purchased this while it was half off at Hobby Lobby, so I got it for $2.99. I have a ton left over so I can use it on another project in the future). This is to make the stem. If you don't want to purchase a roll just for that, use something around your house. If you have green acrylic paint, you could paint an empty toilet paper tube to use a stem.
Ribbon (I used some orange ribbon I had left over from a Wedding Project, but really you can use anything to hang the wreath from.)
Step 1: Paint the Wire Wreath Frame. Like I said, I used Acrylic because I had it on hand, but spray paint would probably be easier! Let dry!
Step 1: Paint the Wire Wreath Frame. Like I said, I used Acrylic because I had it on hand, but spray paint would probably be easier! Let dry!


Then in spots where the weren't braces, I put a dab of hot glue to attach them

Twist twice and a little more glue.

For my 14 in wreath, I used 5 across the top, and five across the bottom.

This is the Deco-Mesh I used

Step 3: Begin by bunching up the Deco-Mesh and attach it to the back of the wreath frame with the pipe cleaners.

Always Twist Twice.

Step 4: Take it down to the bottom pipe cleaner and attach.

I decided I wanted it to be fuller, so I went over it again with a second layer.

Step 5: Continue with the whole wreath. This is basically where you will find what will work best for you, so do it!

After I had filled all the pipe cleaners, I did go back through to finish up the roll and attached more, using more pipe cleaners to make it more full. I wanted a plump pumpkin.

The back of the wreath should look a little something like this

Step 6: Tuck all your pipe cleaners into the back of the wreath, that way they aren't sticking out every which direction.

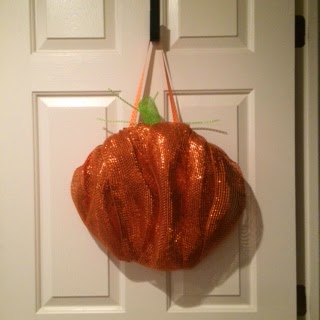
This is what the front should look like.

I used green Deco-Mesh to make a stem.

Step 7: Cut a piece of green Deco-Mesh about 2.5 feet long and roll into a small tube to make a stem. Like I said earlier, if you don't want to buy a roll, then use a toilet paper holder and paint it green!

Step 7: Attack with pipe cleaner to the back of the wreath


I decided to add piece of Deco-Mesh Ribbon Tubing that I had left over from a previous project, I attached them to the back with a pipe cleaner as well.
Hang you Pumpkin Wreath up, you will have to go back and fluff, I pulled at the layers to make them "Stand Up" a bit, to give the pumpkin some definition. The nice thing about Deco-Mesh is it kind of gets caught in itself, so you can make it pouf out more!
:) Happy DIY-ing!
No comments:
Post a Comment