Tuesday, April 14, 2015

Scrapbook Paper Flower Canvas

While on Pinterest (where else????) I saw these canvases made using scrapbook paper, Mod Podge and some paint. I figured it was easy enough to make so I decided I needed to make one to go in our home :)


Here are the supplies you will need:
Scrapbook Paper - I suggest purchasing them when they are half off at Hobby Lobby
Acrylic Paint - Watch for them to be 30% off at Hobby Lobby. I like to use Anita's
2 Foam Brushes
Canvas (I used 8 x 10)
Mod Podge

I selected a light green for the canvas and then greys, blues and black for the "petals" because we have a canvas that my sister-in-laws got us as a shower gift, and my husband suggested using those colors to tie it into our living room! Smart guy he is :)


Step 1: Paint your canvas. I recommend starting on the back, that way I could be sure I liked the color, and to know what would be the easiest way to paint canvas, since it was my first time using canvas. The best brush to use is a foam brush that way you do not have any brush hairs and it will help you cover the canvas more quickly. 
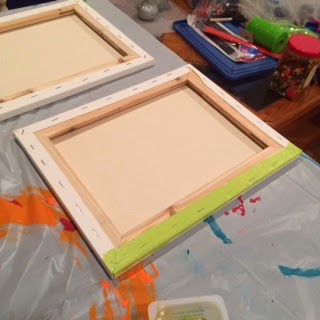
I discovered that two coats would be needed to make sure it had a nice even coat and looked smooth. I also painted down a little ways on the side of the canvas so that way when I flip it over it could easily be painted. If you decide only do one coat on that back, that is fine. 


Step 2:  Paint the front of the canvas. As you can tell, it is very "liney". That is why I did two coats, because I wanted it to be smooth. Let first coat dry completely before moving on to second coat.


Step 3: Or whenever, but I did it while coats of paint were drying. Cut out petals, I made a petal template and traced it on all of the papers. Don't forget to make the center of the flower as well! 


Step 4: Cut out petals

Step 5: Paint second coat on the canvas. You can see that it is much smoother after the second coat. 
I must caution you, make sure that the edges do not have "globs" of paint.


Step 6: After you canvas has dried and all your petals are cut out, lay them out on your canvas to find out exactly where you want them to be. 

My husband and I looked at it, and because I used the 8 x 10, we decided it would look more flowery with smaller petals. So I went back and cut them down to a smaller size. 

Step 7: Glue Flower Center on to Canvas using the Mod Podge and a foam brush. Make sure you have enough Mod Podge to hold it down. Go over it again with more Mod Podge to seal it to the canvas. 

Step 8: It is best to put the petals on in small sections. And after each section, go over the petals with more Mod Podge. 


Step 9: Keep adding layers of petals until you achieve the fullness of the flower that you are looking for. 


 As you can see I just keep going around layer by layer to add and get it to the size that I wanted. 
 Step 10: After all the layers are Mod Podged to the canvas, go over the whole canvas, including any areas that don't have any design, as you want the canvas to have a smooth, even gleam. 


Step 11: After the Mod Podge has dried, probably 3-4 hours, put a final coat of Mod Podge on. You don't necessarily have to do a 2nd coat, but I always like to be sure that my projects are sealed!


This is the canvas after two coats of Mod Podge. I absolutely love the way it turned out. As you can tell, all the petals are cut differently, but that is the nature of a flower, no two petals are the same. 

The canvas in the center is the one that my sister-in-laws got us, so we chose the colors based off of that. 

Once we have them hung up in our living room, I'll put that on here for you to see how they look! 
:)

Update 5/5/15: We finally were able to get our canvases hung up. Here is the finished, finished product!


Happy DIY-ing!

:)


Friday, March 27, 2015

Pumpkin Deco-Mesh Wreath


Materials:
 5 1/2 in wide Orange Deco- Mesh ( I purchased mine after Halloween in 2014 at Hobby Lobby, so I got it for $2.39 a roll. I bought 3 rolls, but only used one. If you purchase it leading up to Fall, you can get it for anywhere between $4.99 and $7.99)
Wire Wreath Frame (I used a 14 inch wreath frame that I purchased at Pat Catan's for $2.79 - you can use any size wire wreath frame, the larger it is, the more Deco-Mesh it will require.)
Orange Paint - I used acrylic because I had it on had, truthfully, Orange Spray Paint would have been easier, but I didn't see the need to purchase it, so I made the acrylic work- it was left over from previous projects. 
Orange Pipe Cleaners  (I purchased at pack of 25 at Pat Catan's for $.83)
Hot Glue  Gun/Hot Glue (This will make some steps much easier! Available at craft stores and many grocery stores.  I have several and didn't pay more than $4 for any of them. One I have had for over 6 years, so don't feel the need to spend a lot!)
Green Deco-Mesh ( I purchased this while it was half off at Hobby Lobby, so I got it for $2.99. I have a ton left over so I can use it on another project in the future). This is to make the stem. If you don't want to purchase a roll just for that, use something around your house. If you have green acrylic paint, you could paint an empty toilet paper tube to use a stem.
Ribbon (I used some orange ribbon I had left over from a Wedding Project, but really you can use anything to hang the wreath from.)


Step 1: Paint the Wire Wreath Frame. Like I said, I used Acrylic because I had it on hand, but spray paint would probably be easier! Let dry!


Step 2: Attach Pipe Cleaners, I stated by attaching them to the braces. Twist them twice

Then in spots where the weren't braces, I put a dab of hot glue to attach them 

Twist twice and a little more glue. 

For my 14 in wreath, I used 5 across the top, and five across the bottom. 

This is the Deco-Mesh I used

Step 3: Begin by bunching up the Deco-Mesh and attach it to the back of the wreath frame with the pipe cleaners. 

Always Twist Twice.

Step 4: Take it down to the bottom pipe cleaner and attach. 

I decided I wanted it to be fuller, so I went over it again with a second layer. 

Step 5: Continue with the whole wreath. This is basically where you will find what will work best for you, so do it!

After I had filled all the pipe cleaners, I did go back through to finish up the roll and attached more, using more pipe cleaners to make it more full. I wanted a plump pumpkin. 
The back of the wreath should look a little something like this

Step 6: Tuck all your pipe cleaners into the back of the wreath, that way they aren't sticking out every which direction. 

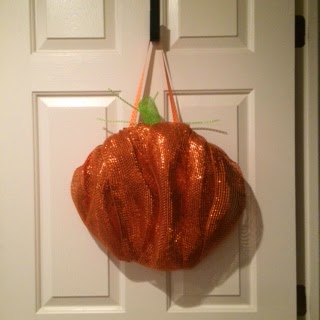
This is what the front should look like. 

I used green Deco-Mesh to make a stem. 

Step 7: Cut a piece of green Deco-Mesh about 2.5 feet long and roll into a small tube to make a stem. Like I said earlier, if you don't want to buy a roll, then use a toilet paper holder and paint it green!

Step 7: Attack with pipe cleaner to the back of the wreath


I decided to add piece of Deco-Mesh Ribbon Tubing that I had left over from a previous project, I attached them to the back with a pipe cleaner as well. 


 Once you have your stem on, and if you choose leaves or vines, cut a piece or ribbon, or string to tie (double knots) to the back of the frame to create your hanger.


Hang you Pumpkin Wreath up, you will have to go back and fluff, I pulled at the layers to make them "Stand Up" a bit, to give the pumpkin some definition. The nice thing about Deco-Mesh is it kind of gets caught in itself, so you can make it pouf out more! 

:) Happy DIY-ing! 


Super Cute Cupcake Ornaments


I saw a picture on Pinterest of some super cute Cupcake Ornaments made from Terra Cotta Pots. I followed the link and found a list of materials. And some very very basic directions. 
I decided that these would be a perfect addition to my best friends Christmas present.. But I knew tackling something with minimal directions can always be difficult. So I started collecting the items I needed in the summer of 2014. Well, come Christmas time, I just didn't get them done. So I slated them for the following Christmas. I looked through the directions once more, made my list of things still needed, and began doing a little research online for my materials.. Just to see what was out there. 


Before we go any further, I imagine you would like a picture of these super cute cupcake ornaments!


Okay, onto the materials list! And I am going to try to include prices and retailers where I purchased items. 


Small Terra Cotta Pots (the original post used the very small ones, I used ones that were in my parents basement, and purchased a few more). These can be purchased at most craft stores for about 50 cents a piece - maybe less. 
Acrylic Paint (your choice in colors) You need to colors for each pot (or use white to lighten the color you have) - also available at craft stores and some grocery stores. You will also need red for your "cherries" on top! 
Styrofoam Balls (I purchased a 6 pack for $2.57  at Pat Catan's - I used the green floral ones because they were cheaper than the white ones) 
Hot Glue Gun & Hot Glue
X-Acto Knife
Wood Beads (purchased at Pat Catan's for $2.99 for a pack of 30 - more than enough. I used the 20 mm size, but use the size that fits most with your Terra Cotta Pot Size)
Snow Tex- I purchased a 16 oz container at Pat Catan's for $7.97. I do know it is available at Hobby Lobby. It is $2.49 for a 2 oz container or $3.99 for a 4 oz container. If you plan to make just one cupcake, the 2 oz container should be plenty. I plan to make some for my Christmas tree, so I went ahead and purchased the largest size. And it was much cheaper that way.)
Diamond Dust (also called Glamour Dust) I purchased this at Pat Catan's for $3.97 for a 6 oz container and I have a TON left! I could not find it at Hobby Lobby - this is not required, but does make it look more like frosting. 
Small beads (used as sprinkles - I found a package at Pat Catan's for 95 cents that gave me 20 grams in different colors. You can use all one color. Or a mixture, whatever fits your fancy! 
Ribbon - choose a color that you like. I got 1/8 thick white ribbon at Pat Catan's. The roll cost me 40 cents, and has 10 yards on the roll. I'll have plenty of ribbon to use on other projects!
Popsicle Sticks.


Step 1: Gather all supplies!

Step 2: Clean off your Terra Cotta Pots. The easiest way I found was to just use a damp rag and wipe them clean. 


Step 2: Paint the entire Terra Cotta Pot the color you want the "cupcake liner" to appear. 
I suggest beginning at the bottom of the pot. It took me two coats (letting dry in between) to make sure it was good and covered so you didn't see the pot color through it. 


Step 3: Use either a lighter or darker shade to paint lines that give it the appearance of the folds in a cupcake liner. If you did not buy two different shades of the same color, you can always add a drop if white paint to your original color, and it will give you a lighter shade. I ended up doing that with the green cupcake, because the one in the picture was too bright compared to the color on the pot. 

Once finished adding lines, it should look like the teal pot on the right.

Step 3.5: Paint your  Wood Bead "Cherries" red. I found it easier to use a little container, and put the red paint in it and roll it all around to make sure the bead was entirely covered.

 After they have started to dry, be sure to roll them over so that the whole bead will dry. 


Step 4: You can do this while your paint is drying at any point in time!  Cut the styrofoam ball in half. 
These are the styrofoam balls that I used. I actually bough three different kinds because I was not sure which size was what I needed. 

I used an X-acto Knife to cut them in half

Don't worry. They don't need to be perfect! 

I put the half in the pot and it was a smidge too big. So I shave a little bit off of the edges so it fit perfectly into the pot!
Step 5: Poke two holes into the styrofoam ball - make sure they are large enough for your ribbon. I used a paint brush that was sitting right next to me. 

**** If you don't want to make ornaments, scroll down to the bottom for an alternative!

This is what the underside of the styrofoam ball should look like


Cut a piece of ribbon that is far too long  to be the ornament hanger, you can always trim off  the excess later. 
 

Step 6; Attach a small piece of a popsicle stick between the two holes - this will prevent your ribbon from pulling through the foam since it is soft. Trust me, it will do it!
Afterward, thread the ribbon through it, and secure to the popsicle stick with a little hot glue

Step 7: Hot Glue the halves into the pots. Be sure to make sure you use plenty of hot glue.

You will leave the ribbon sticking out until the very end! 


And here begins the hardest, most time consuming, and patience requiring part! But in all honestly, it may have been my favorite part of the whole project! 

Step 8: "Frost" your "Cupcake"! 
Use the Sno - Tex (see below)
You are going to "frost" the "cupcake". In all honestly, it is very similar to frosting a cupcake, I should tell you that my cupcakes are never frosted smoothly, I just can't do it. 

Except I felt like I was frosting a cupcake with cottage cheese LOL


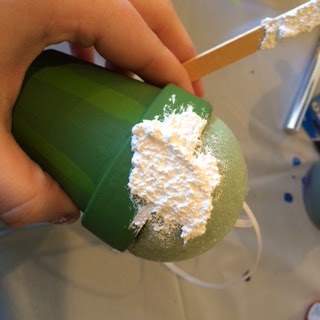
I used a popsicle stick to help me spread it around, as you can see it was lumpy, and sticky, it stuck to the styrofoam, it stuck to the popsicle stick, it stuck to me!

Work your way around the entire pot. I chose to cover the "rim" of the pot, but if you don't want to, you don't have to. 

Continue to work your way around the cupcake. 


When you get to the top, try your best to fill in around the ribbon. If you get a little on the ribbon, that is okay. It will be covered by the cherry. 
Move on to step 9 before the Sno Tex dries. 
Step 9: If you choose to add the diamond dust for extra sparkle, sprinkle it on as soon as you are done with the Sno-Tex. I didn't take an after picture because you couldn't tell I had put it on, but once your cupcakes are dried, you will be able to see it!

Move right onto step 10!

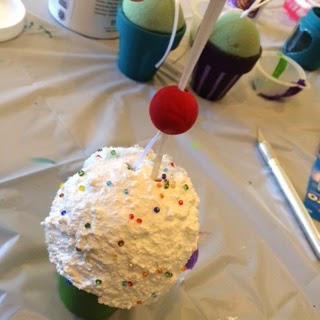
Step 10: Sprinkle beads onto the frosting (Sno - Tex) while it is still wet. 

Sprinkle, sprinkle, sprinkle!

Some of the beads didn't want to stick, so I used the end of a paint brush to help push them down in a little. 


Step 11: While the Sno Tex is still wet, thread the ribbon through the cherry,

Push the cherry down into the Sno Tex. I also put a little hot glue underneath just to be sure it would stay put!
Let dry! The directions on the Sno Tex say to let dry 2-3 hours, but it also said that thicker Sno Tex can take longer. I don't like to chance things, so I let them dry over night!


Step 12: Tie a knot into the ribbon and trim evenly to make ornament hangers!


And you have some super cute Cupcake Ornaments, that look good enough to eat!


Here is the alternative to ornaments! Just super cute cupcake decorations! I think they'll be perfect to put out during birthday celebrations!

The only difference is that I didn't have to make a hanger through the styrofoam and thread the bead. Instead I filled in the hole on the wooden bead with Hot Glue and painted over it. Then Hot Glued the cherry right on top!