Wednesday, November 26, 2014

Holiday Yarn Trees

Since we have our own home, I am looking forward to decorating our home for the upcoming holiday seasons! I absolutely love the holidays and cannot wait to spend our first holidays in our home, with some beautiful directions. I cam across these adorable Holiday Trees at A Million Little Things. So I decided these would be wonderful to decorate our home.
This is the picture I came across, I thought to myself that I could do this! :)
So I started by gathering my supplies.

I decided that I wanted to create a "set" using 4 different sized trees.
* 15 inch ($5.99 at Hobby Lobby)
*12 inch ($4.99 at Hobby Lobby)
*9 inch ($3.99 at Hobby Lobby)
*6 inch ($4.47 at Hobby Lobby for a 2 pack)
*Dark Green Yarn (leftover from other projects)
*Light Green Yarn (leftover from other projects)
*White Yarn (leftover from other projects)
*Hot Glue Gun & Glue (I went through a lot of glue!)
*Scissors
*Silver Bells (Pack of 8 $2.99 at Meijer)
*Pom Poms (I got several packs on clearance at Hobby Lobby for 30 cents a pack! And I bought at pack of Christmas Tinsel Pom Poms regularly $2.99 at Hobby Lobby, but it was half off all Christmas Items, so I got them for $1.49


Some of the supplies I used to create these cure little trees!


Step 1:Use hot glue to attach yarn around the entire base of the tree. After that, use glue whenever you feel necessary to anchor the yarn to the tree. 


Step 2: Continue around the tree, covering all parts with yarn. You will have to go back over and fill back in, creating different depth layers. 

Step 3:Continue all the way up the tree.


Step 4: Attach your tree topper. 
I decided to use a bell to be the tree topper. Be careful when you glue that you don't accidentally glue the "jingler" to the bell!

Step 5: 
Start gluing Pom Poms onto the tree wherever you like. I went through and did one color at a time to try and evenly disperse them. 


Step 6: 
I would recommend doing this first, but I did not have any felt with me, so I had to do it as a final step. Trace the base of the foam tree on the felt. I used brown for the green trees and then white for the white tree. Carefully cut out the circles, you will need some super sharp scissors to cut out the felt circles. I was able to purchase the felt for 20 cents a  sheet. 


Step 7: Carefully hot glue the felt circle to the bottom of the foam tree. This will keep the foam from scratching whatever you set it on to display them. 


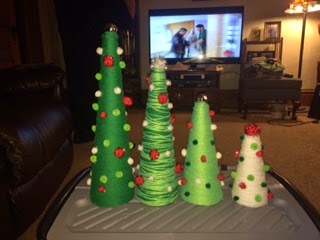
Completed Tree number 1: This is a 9 inch Tree, using a light green yarn, with red tinsel pom poms, dark green pom poms, white pom poms and a bell for the topper

Tree #2: 15 inch tree wrapped in dark green yarn. I used light green, white & red tinsel pom poms and a bell for the topper.  

Tree number 3: Wrapped with Dark green & Light green yarn to give it a different effect. I attached white & red tinsel pom poms to this one, and topped it with a large white tinsel pom pom. This is a 12 inch form. 


Left to right:
15 inch, 12 inch, 9 inch, 6 inch

I can't wait to put this up in our home to decorate for the Christmas season!

Holiday Yarn Trees complete with felt om the bottom so not to scratch the surface they sit on. 
Happy DIYing! :)

Christmas Sparkle Vase

I saw there adorable Christmas Vases on Debbie Doo's blog. I thought it would be perfect!
I plan to make one for myself, one my my mother, and one for my mother-in-law. We will give them to my mom/mother-in-law when we celebrate Christmas together. I plan to put some red carnations in them. I think they will make the perfect holiday decoration!

Here are the supplies I needed to create this adorable vase!
 Sparkle Mod Podge (it's a pink bottle) $6.99 at Hobby Lobby, but I used a 40% coupon, so it was $4.19
Vase - purchased at the Dollar Tree for $1
Foam brush -left over from wedding DIY projects (you can purchase them at any craft store)
Kelly Green Rit Dye (not pictured) - purchased at Meijer for $3.27
Red Acrylic Paint - left over from other projects, available at most craft stores
Round Sponge brushes - also left over from other projects. I know they were purchased at Hobby Lobby
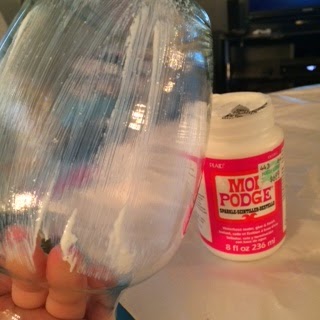
I covered the vase with the Sparkle Mod Podge using the foam brush. I went over it several times to make sure that it was all covered with sparkles. 


Its hard to tell when the Mod Podge is wet that the sparkles are in there. But trust me, they are in there!

Allow the vase to dry. After an hour and a half the majority of it was dry. But I allowed them to continue to dry. I didn't want to rush and do it too early. Patience is a virtue!

After three and a half hours, the Mod Podge appeared to be dry, and I could see the sparkles on the vase.. But I still waited a little while longer to move onto the next step!
The vase will now have a texture. This gives the Rit dye something to attach to. 


 The vases are completely dry and I am ready to paint on the Rit dye.

I chose to use the Kelly Green color dye. The tutorial suggested using Apple Green, but I wasn't a huge fan of that color. 

I began painting the Rit dye onto the vase lightly. 

It started to look like it was dark, but I kept on painting. 


I hadn't completed the top of the vase because I was holding it from the inside. Later after that part had dried, I went back and painted the top of the vase. 
After I let the vases dry, I came back and was very sad :( there were lines all over from where the dye had run. So I thought I would take a damp wash cloth and gently rub the vase with room temperature water. 

It worked! It gave a much lighter (yet still green tint) to the vases. If you are happy with how dark yours turns out, then keep it!

I used some Crafter's Acrylic Gloss in Christmas Red that I had left over from some other projects. I would highly recommend using an acrylic paint, this type of paint covers so wonderfully. Next comes the red polka dots! 


Polka dotting away!

I just went around and polka dotted randomly, just enough to give it some cute sass. 

 After I had polka dotted all three vases. 


I am going to embellish these vases with some cute green and red chevron ribbon that I got from Hobby Lobby for $2.99, but I bought it when Christmas stuff was half-off. So it was only $1.49. And I am going to tie the Cinnamon Stick into the ribbon to give the vase a little spice! 

Ta-da!!


Tuesday, November 25, 2014

Ornament Wreath

I'm sure you have all seen ornament wreaths on Pinterest and all over different websites. So I decided that I needed to make one for our house for this Winter!


So I started collecting the supplies for this wreath last year after Christmas.
I have 4 different packages of ornaments. Two of them came from Kohls and I got them for $1.99 each for a pack of 24. One package of 24 came from Wal-Mart for $2.50. And the other from Dollar General for $2.00 for 24.
And one present ornament from Dollar General for 25 cents. I thought it would be a cute addition!
I bought wreath from Hobby Lobby


14" wreath from Hobby Lobby. I got it for $2.99 with the 40% off coupon they have weekly. 

Here's a close up of the ornaments. So you can see that I chose bright colors to decorate the wreath with! 


I had found a few boxes of silver at Dollar General after Christmas last year, so I used those as well!!
I started by gluing the ornaments onto the wreath in a random pattern. 


I decided it would be best to go around and do the interior of the wreath first. 

Then I went back through and started filling in around the wreath. 


As I kept going around it started to fill in more and started looking like an amazing wreath!

Just keep gluing, just keep gluing, just keep gluing, gluing, gluing. What do we do, we glue, glue, glue, glue! 

Getting closer! I used the mini ornaments and went around and filled in with those. 

Then I added the present ornament to the back so it would dangle from the top of the wreath. 

I glued it from the back and then added some ribbon for it to be hung from. 

I tied the ribbon to have a bow at the top to hang the wreath from. 

And the finished wreath. 

I used about 150 different sized ornaments to complete this wreath. Between the ornaments and the wreath. All in all, the wreath cost me about $14 dollars because I purchased the ornaments after Christmas and got such a good deal on them! 
For now this wreath with be in our house for the holiday season. But once I have a classroom, I think I will use it in a classroom to decorate! And kids will definitely love it! :)

Happy DIYing!