While on Pinterest (where else????) I saw these canvases made using scrapbook paper, Mod Podge and some paint. I figured it was easy enough to make so I decided I needed to make one to go in our home :)


Here are the supplies you will need:
Scrapbook Paper - I suggest purchasing them when they are half off at Hobby Lobby
Acrylic Paint - Watch for them to be 30% off at Hobby Lobby. I like to use Anita's
2 Foam Brushes
Canvas (I used 8 x 10)
Mod Podge
I selected a light green for the canvas and then greys, blues and black for the "petals" because we have a canvas that my sister-in-laws got us as a shower gift, and my husband suggested using those colors to tie it into our living room! Smart guy he is :)

Step 1: Paint your canvas. I recommend starting on the back, that way I could be sure I liked the color, and to know what would be the easiest way to paint canvas, since it was my first time using canvas. The best brush to use is a foam brush that way you do not have any brush hairs and it will help you cover the canvas more quickly.
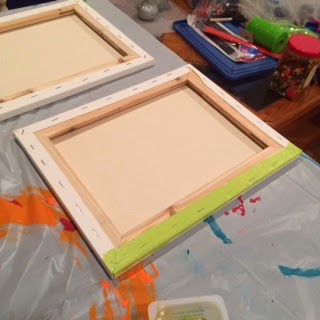
I discovered that two coats would be needed to make sure it had a nice even coat and looked smooth. I also painted down a little ways on the side of the canvas so that way when I flip it over it could easily be painted. If you decide only do one coat on that back, that is fine.

Step 2: Paint the front of the canvas. As you can tell, it is very "liney". That is why I did two coats, because I wanted it to be smooth. Let first coat dry completely before moving on to second coat.

Step 3: Or whenever, but I did it while coats of paint were drying. Cut out petals, I made a petal template and traced it on all of the papers. Don't forget to make the center of the flower as well!


Step 4: Cut out petals
Step 5: Paint second coat on the canvas. You can see that it is much smoother after the second coat.
I must caution you, make sure that the edges do not have "globs" of paint.

Step 6: After you canvas has dried and all your petals are cut out, lay them out on your canvas to find out exactly where you want them to be.

My husband and I looked at it, and because I used the 8 x 10, we decided it would look more flowery with smaller petals. So I went back and cut them down to a smaller size.
Step 7: Glue Flower Center on to Canvas using the Mod Podge and a foam brush. Make sure you have enough Mod Podge to hold it down. Go over it again with more Mod Podge to seal it to the canvas.

Step 8: It is best to put the petals on in small sections. And after each section, go over the petals with more Mod Podge.

Step 9: Keep adding layers of petals until you achieve the fullness of the flower that you are looking for.


As you can see I just keep going around layer by layer to add and get it to the size that I wanted.

Step 10: After all the layers are Mod Podged to the canvas, go over the whole canvas, including any areas that don't have any design, as you want the canvas to have a smooth, even gleam.

Step 11: After the Mod Podge has dried, probably 3-4 hours, put a final coat of Mod Podge on. You don't necessarily have to do a 2nd coat, but I always like to be sure that my projects are sealed!

This is the canvas after two coats of Mod Podge. I absolutely love the way it turned out. As you can tell, all the petals are cut differently, but that is the nature of a flower, no two petals are the same.

The canvas in the center is the one that my sister-in-laws got us, so we chose the colors based off of that.
Once we have them hung up in our living room, I'll put that on here for you to see how they look!
:)
Update 5/5/15: We finally were able to get our canvases hung up. Here is the finished, finished product!

Happy DIY-ing!
:)